10 Tips For Improving Your Nature Photography Skills

10 Tips For Improving Your Nature Photography Skills

Puffin

To celebrate Nature Photography Day here's our top 10 tips for nature photography.

Wow, we can’t believe we’re already half-way through #30DaysWild! We hope you’re having a great June so far. We’ve loved seeing what you have been up to and sharing your photos on our social media channels.

To celebrate Nature Photography Day one of our Nature Reserves Officers, Ronald Surgenor, has put together his top 10 tips for nature photography. Nearly all the photos in this blog are his own. Check him out on Twitter or Instagram @RonaldSurgenor.

Some of these tips refer to using an SLR camera, but some are more general tips that can be applied when using a phone.


1. Know Your Subject


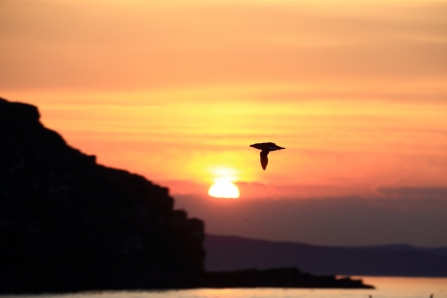
Goes without saying, right? Since much of wildlife photography is based upon capturing fleeting moments of nature, it pays to predict your subject’s behaviour. Knowing your subject can make the difference between being ready for capturing that 'golden moment' and watching it fly by you.

There is only one way to get to know wildlife…spend time with them. Don’t just hang around for a few minutes and seek out the next subject if the one you are observing isn’t delivering the goods. Sit with them. Watch them. Wait.

You often learn more about other animals’ behaviour while you are waiting on your target species. Picking up on alarm calls from Wrens and Blackbirds, tunes you in to when predators are moving through woods, letting you get ready for a fleeting glance of a sparrowhawk, fox or pine marten as it hunts through dense cover.

Badger

Badger

2. Know Basic Rules of Framing A Photograph, But Don’t Worry About Breaking Them


Understanding proper exposure and the use of the histogram, proper composition using a guideline like the 'rule of thirds' are all important general rules to follow.

In wildlife photography, you will hear people talk about eye contact with the subject, as this gives to the image, that feeling of connection. In the case of bird photography, this gets taken a step further in the sense that the “head angle” in relation to the camera’s lens needs to be at least perpendicular to it, but ideally turned a few degrees towards the photographer.

Fox cub in grass

Fox cub

3. Work With Natural Light


The first piece of advice I got from a wildlife photographer when I started shooting, is to stick to the hours of golden light. This means getting up early in the morning and being in the field before sunrise, and going out in the afternoon to make the most of the last hours of sunlight.

The light over midday (mostly between 11am and 2pm) is generally harsh and robs images of the depth of field that it needs. The exception is an overcast day, when the clouds act like a massive soft-box to diffuse the light evenly.

Often we will find ourselves in a position where the light isn’t ideal, or worse, the light is great but from the wrong direction…and we also aren’t always in a position to move around to a better spot. The good news is that light from the wrong direction can add lots of mood to an image. Shooting into the light is tricky to pull off, but you can get some pretty interesting images from a less-than-ideal light position.

4. Look For Areas Where Animals Congregate


In wildlife photography – one is company, and two is often a crowd, especially when there’s food involved. If you have a good view of more than one member of a species and they are relaxed with you being there– stay a while! Any location where you get more than one animal will eventually lead to some sort of interaction, that could be anything from badgers grooming each other to starlings squabbling over food.

Two pine martens playing on a thick branch

Pine Martens

5. How Low Can You Go?


How you portray your subject can make all the difference in the world. Try to get an eye-level perspective (even lower if you can). This brings the viewer of your image right into the scene and confronts them with the view of the world from your subject’s perspective.

Obviously “eye level” is relative (you will pretty much always be at a lower perspective than for example a giraffe), but you get the idea. Always bear in mind the constraints of your environment, one location requires me wear chest waders and an old waterproof jacket so I can lie in the mud to photograph wading birds, but the resulting images are worth the effort.

Elephant Hawk Moth

Elephant Hawk Moth

6. Know Your Kit


The really action-packed moments in wildlife photography last between 5 to 20 seconds. If you are not familiar with the settings of your camera or the abilities of your chosen lens, you will miss opportunities through having to spend time looking at your camera.

Go to a local nature reserve or park and photograph the more approachable animals and plants to see what settings work:

  • Know what the minimum shutter speed is to get a sharp image with your camera/lens combo
  • Know how to quickly toggle between focus points or focus modes
  • Know how high you can push your camera’s ISO setting and still achieve acceptable result

In general, most, if not all, of the necessary adjustments to your exposure/focus settings can be made without lifting your eye from the view finder.

Flycatcher Bird

Flycatcher

7. You Don’t Need A Long Lens


Too many wildlife photographers get fixated on thinking they need a long lens, where it becomes an obsession to have the longest/biggest lens possible. I know this is location-dependant as you might need more than 600mm just to get any shot at all in certain wide-open spaces, but the issue I want to tackle is more related to our obsession to get as close as possible to the animal.

The result is often an image that looks like it could be taken of a captive subject in a controlled location, with a perfect smooth background and no idea of the real environment in which it finds itself. Wild animals rarely pose is those picture perfect locations you see in books and online. For example, I have holes drilled into logs on spots I use to photograph Pine Martens. It means they stop just long enough to get the treat out of the hole which gives me the chance to grab a shot in an area with a clean background. Other times I will try and set up the shot to show them climbing through the log pile, all taken with a 400mm lens and a bit of field-craft.

Challenge yourself to shoot at a wider angle to give the viewer a better idea of where you took the image and where your subject has to carve out a living in the wild. This is applicable to any species you photograph – from the squirrel to the deer to the robin in your garden.

Red Mason Bee (c) Penny Frith

Red Mason Bee (c) Penny Frith

8. Patience Is Not Just A Virtue, It’s A Necessity


As a wildlife photographer, you have to get used to the fact that things in nature are unpredictable, you can do all the groundwork in the world before you try to get that special image, but photographing any wild animal means any amount of factors can get in the way of that great image.

It is vital that you become patient…very patient. Observing your subjects, getting to know their behavioural patterns, requires a great deal of patience. Often the implications are that you need to return to the same spot for days before things start to happen…and even then you run the risk of nothing happening and having the feeling of having wasted your time, but no time outdoors is wasted time, you are always learning small things each time you are out. 

Puffin swimming on water

Puffin

9. Join Local Wildlife Organisations, Groups, Social Media Groups


All wildlife charities run guided walks throughout the year, go along and meet like-minded people, and on the walk snap away at any highlights pointed out by the guide and make a mental note on the locations. You might not get the image you want on the day but there is nothing to stop you coming back at a later date to capture that special image.

Take notes of when certain highlights are there to photograph as each season has something special to look out for. June is always seabird season for me, with reserves like the Isle of Muck having guillemots, razorbills, shag and eider duck nesting. You can see the adult birds out feeding on the surrounding waters. Another highlight is the Orchids coming out in swathes on reserves at Straidkilly, Slievenacloy and Glenarm.

10. Enjoy being out in nature


I will finish with the following advicejust get outside and enjoy it!!

By this I don’t just mean you need to physically show up and you need to be at the right place at the right time –of course that applies – but I actually mean you need to be in the moment and don’t get caught up so much with the technical issues and your settings, that you don’t take in the moments you are witnessing while out photographing birds and wildlife.

We need to be mindful of the privilege of spending time in nature. Maybe for you it’s just the most isolated spot in your local park where you can sit and observe and photograph squirrels and birds, or maybe it’s braving a trip in a small boat to watch whales.

Regardless, enjoy what you are doing! Have fun doing it and enjoy the thrill of the chase, when you get that almost perfect image (as a photographer you are always your own worst critic) it will stay with you forever.